Allen Bradley MicroLogix 1100 “Servo Control” with Mitsubishi MR-J4-A
Authored by FAIZAL AFZAL
Introduction
In the world of industrial automation, precise control over servo and stepper motors is crucial. However, finding comprehensive tutorials that guide you through the process of using an Allen-Bradley MicroLogix 1100 PLC to control a Mitsubishi MR-J4-A Servo Motor can be challenging. This tutorial, crafted by Faizal Afzal, fills that gap, providing a step-by-step guide to using the MicroLogix 1100’s “Pulse Train Output” (PTO) function to control the Mitsubishi MR-J4-A Servo Motor.
This guide is intended for automation professionals and enthusiasts who need a reliable method to integrate these two powerful devices into their systems.
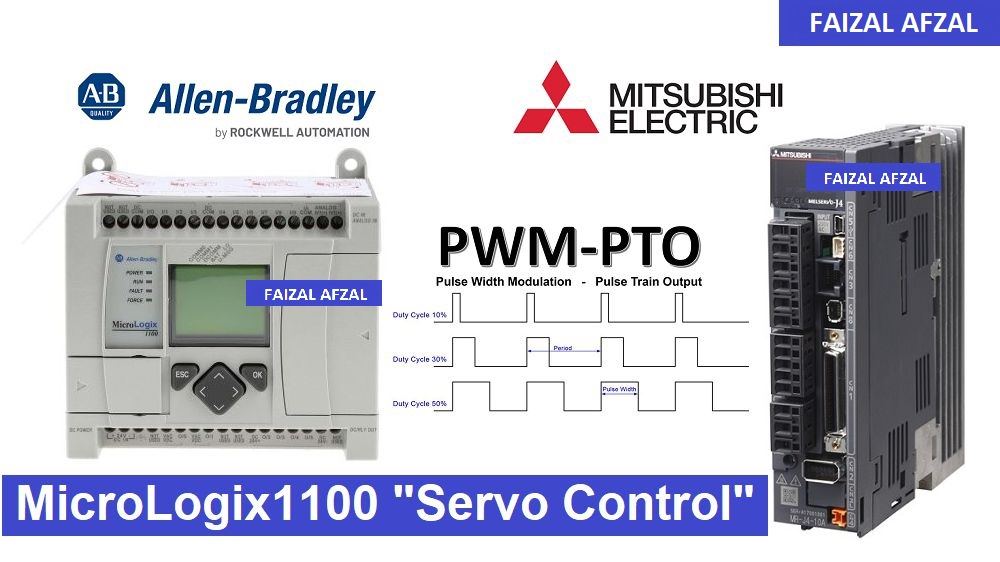
Step 1: MicroLogix 1100 & MR-J4-A “Wiring Diagram”
1.1 Wiring Essentials
To establish effective communication between the MicroLogix 1100 PLC and the Mitsubishi MR-J4-A Servo Motor, proper wiring is essential. Below is a simple wiring diagram that outlines the necessary connections:
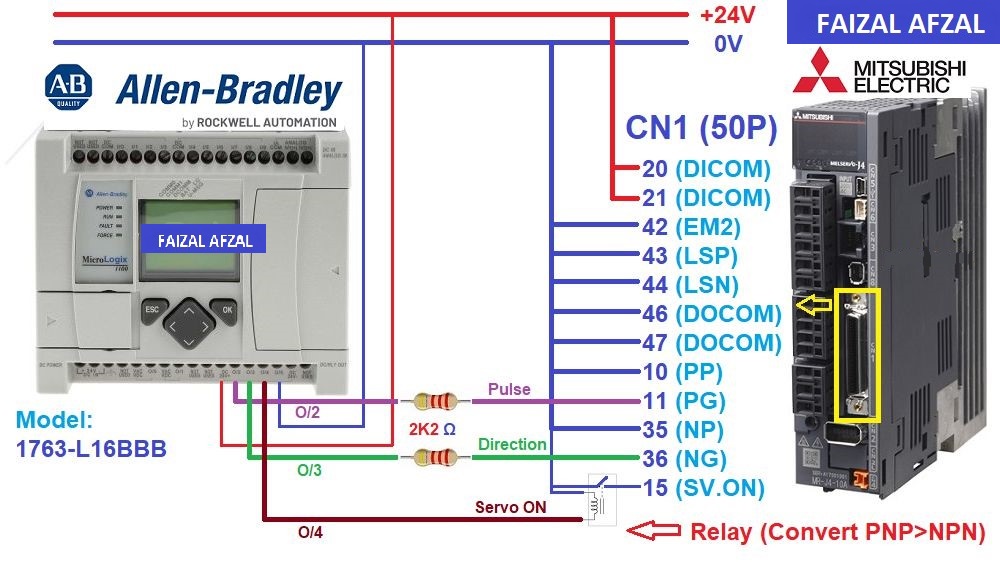
The wiring diagram between the MicroLogix 1100 PLC and the Mitsubishi MR-J4-A Servo Motor. Highlight connections for power, pulse, direction, and Servo ON/OFF control.
1.2 Key Wiring Components
- Voltage Reduction: Utilize a 2.2kΩ resistor to reduce the voltage from 24VDC to 5VDC for the pulse and direction signals. This step is crucial to protect the Mitsubishi MR-J4-A Servo Motor and ensure correct signal levels.
- Relay for Output Switching: Use a relay to switch the output from PNP to NPN as required by the servo motor input configuration.
Step 2: Mitsubishi MR-J4-A Driver Configuration
2.1 Configuring the Servo Driver
The Mitsubishi MR-J4-A Servo Motor requires specific configurations to operate effectively with the MicroLogix 1100 PLC. These configurations can be made using the physical buttons on the servo driver or via the MR-Configurator2 software, which provides a more user-friendly interface for setting the necessary parameters.
2.2 Key Parameters for Configuration
- PA1: Servo Control Mode Selection
- Setting:
1000(Position Control Mode) - Function: Enables the servo motor to operate in position control mode, which is essential for precise motion control based on pulse inputs.
- Setting:
- PA6/7: CMX/CDV (Input Pulse Gain Ratio)
- Default Setting:
1/1 - Function: Determines the ratio of input pulses to motor revolutions, ensuring accurate interpretation of pulse signals. The default setting corresponds to
131072 pulses/revolution.
- Default Setting:
- PA13: PLSS (Selection of Control Pulse Types)
- Default Setting:
0100 - Function: Configures the type of control pulses that the servo will accept, based on the pulse output method of the PLC.
- Default Setting:
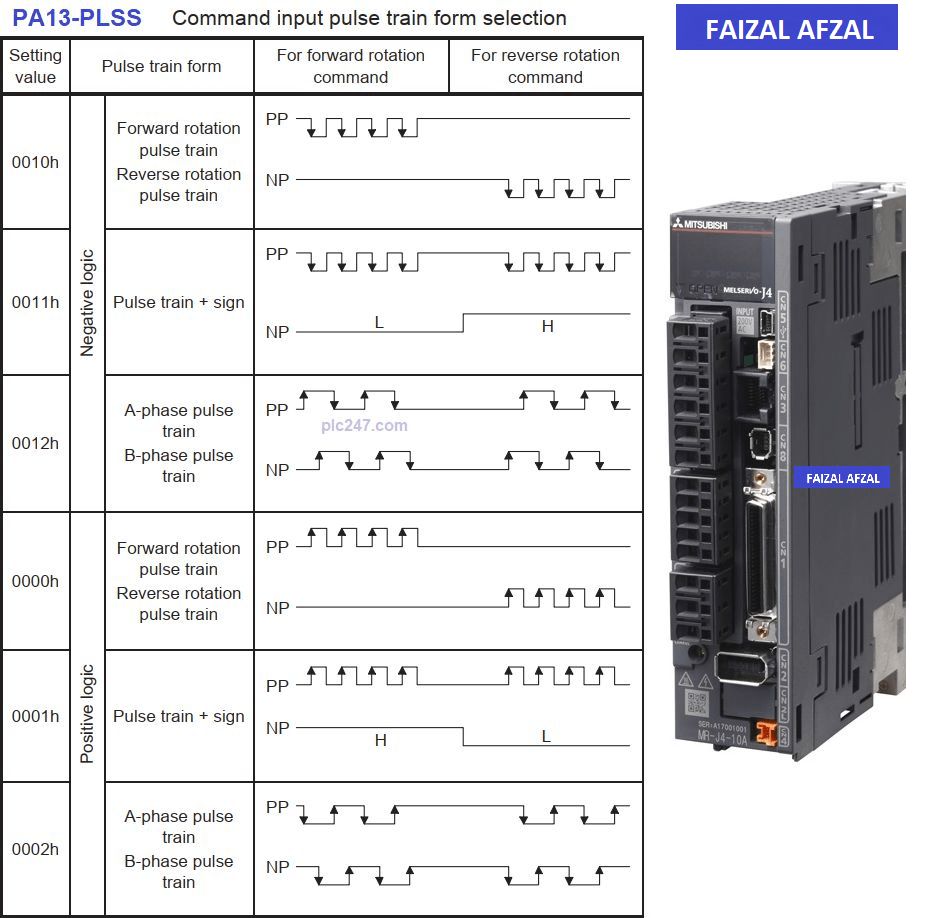
Table here that lists the various pulse input types and their corresponding settings
2.3 Recommended Configuration for Basic Operation
To ensure that the Mitsubishi MR-J4-A Servo Motor operates smoothly, use the following parameter settings:
- PA1:
1000(Position Control Mode) - PA6/7:
1/1(Default Pulse Gain Ratio) - PA13: Set according to the pulse type output from your PLC.
These settings will ensure that the servo motor responds correctly to the control signals from the MicroLogix 1100 PLC.
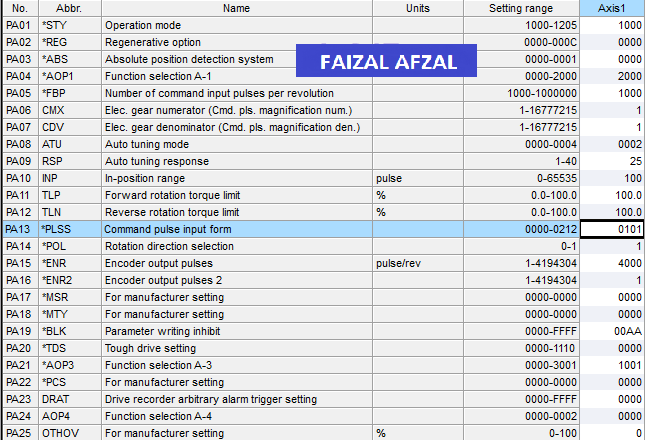
The key parameter values and their corresponding settings.
Step 3: RSLogix 500 Function Files Setting
3.1 Overview of RSLogix 500 Settings
To control the Mitsubishi MR-J4-A Servo Motor, the MicroLogix 1100 PLC must be configured correctly within the RSLogix 500 software. This section covers the necessary function file settings that need to be adjusted to enable pulse output control.
3.2 Setting Up Pulse Output Parameters
- Model: MicroLogix 1100 1763-L16BBB
- Note: This model supports two pulse output ports with a maximum speed of 40kHz, which is sufficient for controlling most servo motors.
- Output Configuration:
- By default, the output parameter is set to
-1. To avoid errors and enable proper operation, this setting must be changed to either2or3, depending on the physical output port being used for pulse generation.
- By default, the output parameter is set to
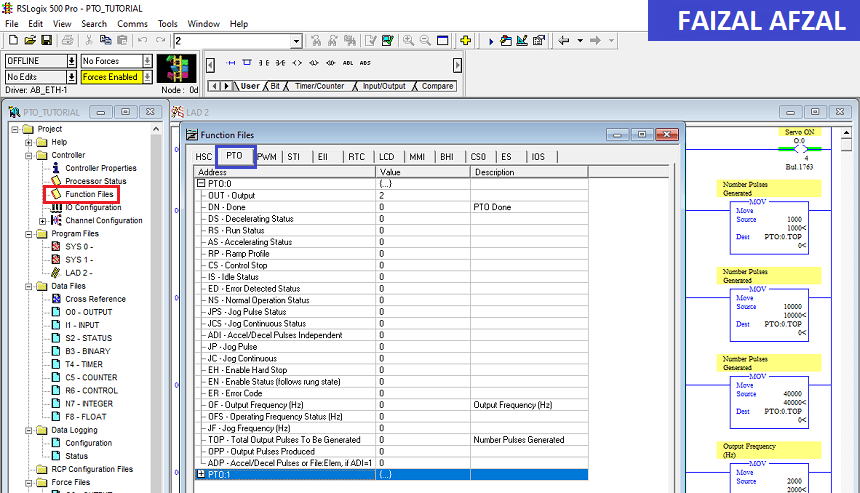
The RSLogix 500 software, highlighting the location and configuration of these settings.
Step 4: MicroLogix 1100 PLC Programming
4.1 Introduction to PLC Programming
Programming the MicroLogix 1100 PLC involves creating logic that will control the forward and reverse rotation of the servo motor, as well as adjusting the pulse speed. This section will outline a simple program structure to achieve these functions.
4.2 Basic Control Logic
- Forward/Reverse Rotation Control:
- Implement ladder logic to control the direction of the servo motor. This involves using digital outputs to switch the direction signal, allowing the motor to rotate clockwise or counterclockwise based on the input conditions.
- Pulse Speed Adjustment:
- Create a rung in the ladder logic that allows the speed of the servo motor to be adjusted by varying the frequency of the pulse output. This is crucial for applications that require dynamic speed control.
4.3 Simplified Program for Testing
For those who are new to PLC programming, below is a simplified program that can be used to test the basic operation of the servo motor. This program focuses on controlling the servo’s on/off states and basic movement commands.
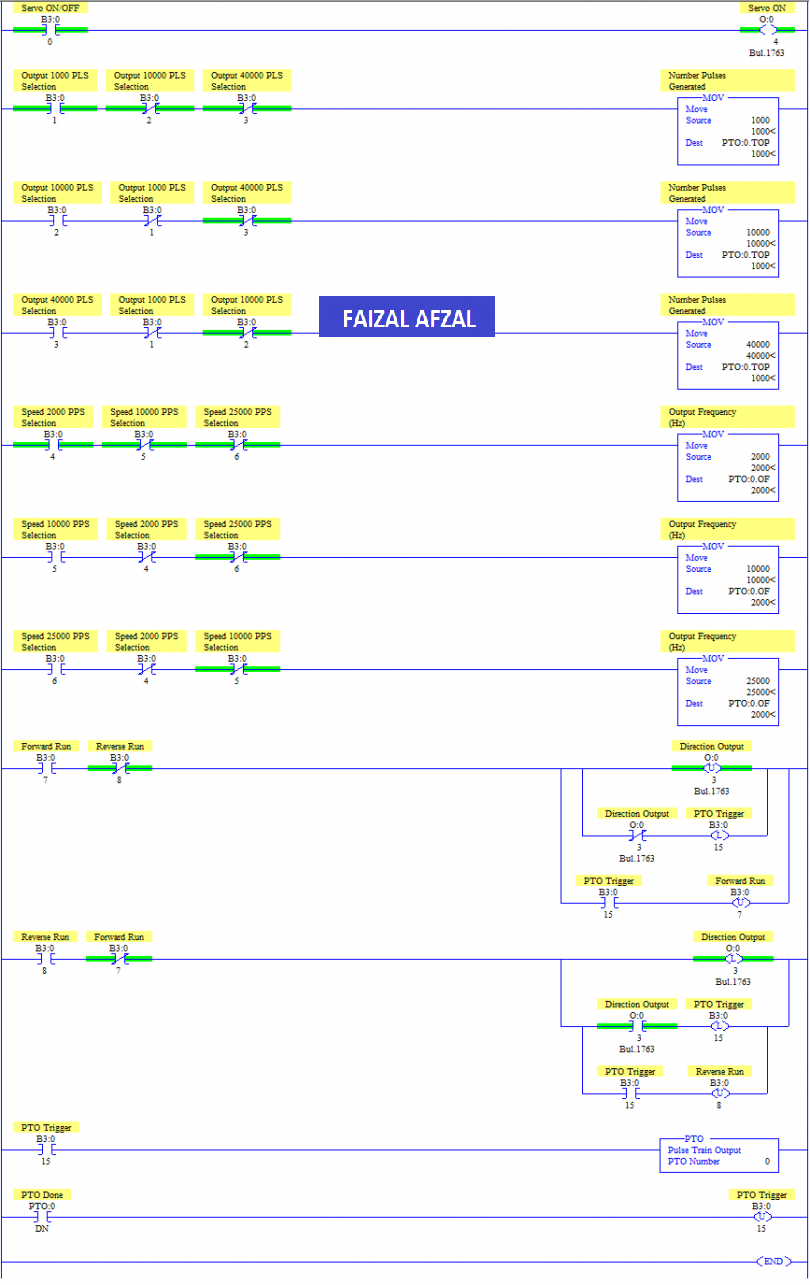
The simplified control logic program, with annotations explaining each section of the code.
Conclusion
This tutorial provides a detailed guide on how to control a Mitsubishi MR-J4-A Servo Motor using an Allen-Bradley MicroLogix 1100 PLC. By following the steps outlined above, you will be able to set up the necessary wiring, configure the servo driver, and program the PLC to control your servo motor with precision.
For those looking to expand their knowledge, further exploration of advanced PLC programming techniques and additional sensor integration is recommended to enhance your system’s capabilities.
For further assistance or more detailed information, please refer to the Mitsubishi manuals or contact a Mitsubishi Electric support representative.